How To Type in Hawaiian
Some courses require you to install Hawaiian Font Keyboards so you can type papers with correct Hawaiian diacritical marks such as the kahakō and ʻokina. The following instructions are for Windows and Mac computers.
Activating the Hawaiian Language Keyboard
Windows 10
Go to the “Start’ button in the lower left hand corner of your display (Note: the word “Start” no longer appears but it functions as it has in previous incarnations of Windows). Select the “Settings” menu and the Settings window will open.

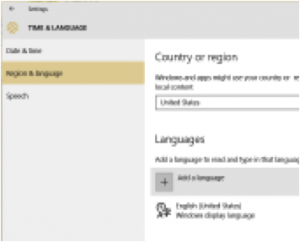
From the Settings window, click the “Time & language” icon. Select “Region & language” menu item. Select “Add a language” as shown at the right.
 Scroll through the many languages found in this window and select “Hawai’i”. The Hawaiian keyboard is now activated.

Look to the right side of the bottom menu of your display, and you will now see a small keyboard icon with the abbreviation “ENG” to the right. Click on the “ENG”, and you will now see the Hawaiian Keyboard, HAW, as an option. Select the Hawaiian keyboard.
This menu appears whenever two or more keyboards are activated, and you may toggle between these two keyboard by selecting them from this menu. You may also press Windows Key+Space to toggle between the two keyboards.

Windows 7 and XP
Download the fonts to your computer here:
Mac Computers
Mac users do not need to download a font because the keyboard is already built in to the MacOSX. The following video shows you how to turn on the Hawaiian Keyboard for MacOSX.
Typing Kahakō and ʻOkina in Windows 10 and Mac
- To type any lower-case vowel with the kahakō, simply hold down the right ALT (PC) or OPTION (MAC) key while typing any vowel.
- To type any upper-case vowel with the kahakō, simply hold down the right ALT (PC) or OPTION (MAC) and Shift keys while typing any vowel.
- To type the ‘okina, simply press the apostrophe key.
- To type a plain apostrophy, hold down the Right-ALT (PC) or Right-OPTION (MAC) key while typing the apostrophe key.
